Slider

slide1

Drone Structure Scan - Derelict Cottage

Detailed 3D model of and old derelict cottage in Midvale.

slide2

Small Drone Mapping 101

The Aero Scout shares his experiences with drone mapping and 3D models.

slide3

Arthur River Mt Pleasant Kitchen - 3D drone structure scan

3D model of the heritage building Mt Pleasant Kitchen in Arthur River.

slide4

Chestnut Brae - Farm planning map in Nannup

Demonstrating how drone imagery can be used as a base for effective farm planning.

slide5

Drone Structure Scan - Heritage Lighthouse

Drone structure scan of the heritage South Mole Lighthouse in Fremantle.

Primary School - 3D Photomesh and Orthomosaic

Primary School - 3D Photomesh and Orthomosaic
3D model of a small primary school created with drone imagery

Mission Summary

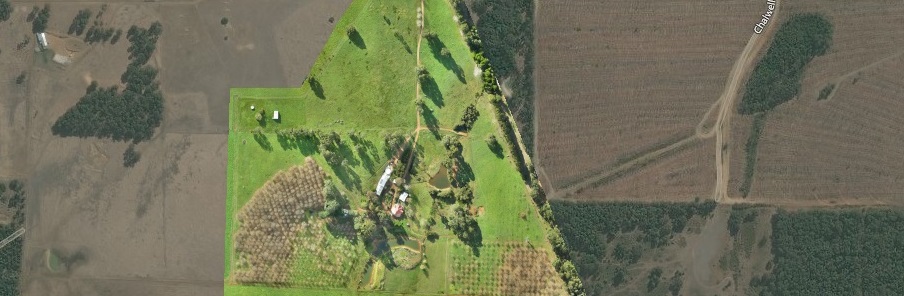
  • Goal: Test 3D mapping for a site with more complex geometry (structures and trees)
  • Tech: QR X350 Pro quadcopter drone, SJ 4000 actioncam, Mission Planner, Recap 360
  • Conditions: Midday, sunny, nil wind, magpies swooping
  • Outcome: A single grid pattern for collecting images does not seem sufficient for such a complex site. 

With my new G-2D gimbal attached to the Walkera QR X350 Pro drone I headed to the local primary school (on a non-school day of course) to test my methodology against a more technical model, one with open flat areas, trees and buildings. I'm expecting to get much better results with the gimbal installed as it keeps the camera facing directly towards the ground, this helps in eliminating poor quality pictures that are taken during a bank or oscillation, which could degrade the quality of the photo alignment.

Primary School - 3D Photomesh and Orthomosaic
QR X350 Pro drone plus modified handset and camera ready for 3D mapping mission
As usual I did my flight planning in Mission Planner. The flight is not covering a large area (just under 5 acres) however because the smallest time lapse on the SJ 4000 camera is 5 seconds I need to fly the QR X350 Pro at a slower ground speed to get the correct lapping in the photos. This means I'm using most of my flight time (taking into account adequate safety and landing time) with this small area.

Using the 'grid' function in Mission Planner enables the drone pilot to more accurately prepare a flight plan so that there is optimal photo overlap. You can see from the image below, Mission Planner has predicted how often the photos should be taken and how much overlap that should result in. For this project, I think the vertical overlap was fine however after seeing the results I think the horizontal overlap could have been better.

Primary School - 3D Photomesh and Orthomosaic
Flight plan showing predicted image overlaps
The model below is produced using only 'medium' settings in Agisoft Photoscan as that's all my 4 yr old laptop could handle. Also I'd consider the imagery to only be of a medium quality from the SJ 4000 with it's 12Mp sensor, quality is degraded more as the 12Mp are spread over the extremely wide 170 degree lens.

Nevertheless the results I felt were quite good when kept at a reasonably low zoom, if you get in closer you'll find many problems with the shape and accuracy of the model. Apparently, trying to get accurate photogrammetry for surfaces such as water and building roofs is very tough. Also, the quality of the model has been decreased during the upload process to Sketchfab.

See the model uploaded to Sketchfab below.


I'm hoping to improve the quality of the final model in future with a tighter grid pattern as well as a cross pattern (grid in both directions) to get more overlap on the images, a higher setting during processing and an optimised model for uploading.

Microsoft ICE had troubles stitching the images together for this project. As yet I'm not sure why this has happened, perhaps too many trees or too many lines on the netball court which confused the algorithms.

Primary School - 3D Photomesh and Orthomosaic
Photo stitch produced in Microsoft ICE - didn't seem to work too well, especially around the netball courts
Autodesk Recap 360 really struggled with this project. I tried using the original 'distorted' images from the SJ 4000 camera with it's 170 degree lens AND I also 'de-fished' the images to flatten them out. Neither model was acceptable, extremely low quality and very poor accuracy, see screenshot below.

Primary School - 3D Photomesh and Orthomosaic
Autodesk Recap 360 had alot of troubles dealing with this project and the results were very poor.
This has been another 'drone adventure' in aerial surveying, inspection and mapping by The Aero Scout.

Alkimos Beach - 3D Photomesh and Orthomosaic

3D model of a section of Alkimos beach

Mission Summary

  • Goal: Explore environmental mapping applications with a small UAV
  • Tech: QR X350 Pro quadcopter drone, SJ 4000 actioncam, Mission Planner, Photoscan
  • Conditions: Midday, scattered cloud, gusty winds
  • Outcome: I was very happy with both the 3D model and the orthomosaic, flight planning in the field was also an excellent experience. 

I wanted to test creating a 3D mapping model of a coastal dune/beach area. Environmentalists and research groups would use this technology to monitor coastal erosion, or sea levels over time by comparing two or more models of the same strip of beach.

Conditions were tough, the sea breeze was in and the little Walkera QR X350 Pro quadcopter/drone had to deal with 15km/h winds, which it handled very well, plus with the G-2D gimbal stabilising the camera it made little to no impact on the quality of the images taken.


I wasn't sure which part of the beach I'd be surveying so I took my laptop along with Mission Planner into the field and planned my flight onsite. This worked very well as it was great to be able to look for obstacles and choose the most 'appropriate' part of the beach to survey and map rather than guess, which is what I've previously done when flight planning from home.

Mission Planner does a great job at predicting the amount of photos that will be taken and overlap based on the planned height and speed of the drone and the type of camera being used.

Flight planning in the field using Mission Planner
Here is the finished model, produced in Agisoft Photoscan and uploaded to Sketchfab for easy viewing.


Here is a stitched photomosaic produced using Microsoft ICE. You'll see that what it lacks in 3D it more than makes up with it's high resolution. Click on the image and zoom in on details.

This has been another 'drone adventure' in aerial surveying, inspection and mapping by The Aero Scout.

Small Construction Site - 3D Photomesh and Orthomosaic

Small Construction Site - 3D Photomesh and Orthomosaic

Mission Summary

  • Goal: Create a basic 3D mapping model and 'stitched image' orthomosaic.
  • Tech: QR X350 Pro quadcopter drone, SJ 4000 actioncam, Mission Planner, Recap 360, Photoscan
  • Conditions: Morning, sunny wilth nil wind
  • Outcome: Whilst I could create a 3D model and an orthomosaic based on the images taken from the drone, the results where only of low/medium quality.

After a long break from mapping missions (12 months) I'm back with a slightly upgraded kit; the G-2D gimbal for the Walkera QR X350 Pro quadcopter/drone should allow me to create better quality orthomosaic and 3D models for UAV mapping.

The first project I thought I'd test the new gear on was a small construction site right next to the large field I usually fly in. I felt it was an excellent first project as the area is clear of objects, I'm familiar with the flying conditions, it's mainly flat with only a couple of topographic features but it still had a couple of small structures, mounds of dirt and equipment that I could test the accuracy of the model with.

Small Construction Site - 3D Photomesh and Orthomosaic

As a basic 'ground truthing' exercise you can compare the above image to the model below. You'll see that there is some slightly higher ground to the right, a few trees, plus a couple mounds of dirt that are roughly the height of the construction office. There's also a few perimeter fences around the site office and equipment.

Flight planning was done using Mission Planner, I just love how comprehensive yet intuitive this program is. It has tools to simply draw a polygon around the area you wish to survey, then based on the height you plan to fly and the type of camera you are using it plans the grid pattern that the drone will fly, this gives the best result for overlapping images. It also displays a summary screen showing the size of the area, the expected flight time, number of photos to be taken and much more.

Small Construction Site - 3D Photomesh and Orthomosaic

Here is a screen capture of my laptop showing the model generated from the photos. It shows each 'camera location' confirming the overlap that Mission Planner predicted. It also gives the drone pilot other summary information such as the area surveyed, the number of photos to be taken and flight time, very handy for deciding if it will be within safety limits.

Small Construction Site - 3D Photomesh and Orthomosaic

The results for the model created in Agisoft Photoscan are not bad. You can see that the terrain has been accurately re-created, for me, the main let down with this model is the quality of the site office and equipment. That said, my laptop can only handle creating a 'medium' quality model so perhaps they would look better if produced on a higher setting.


Compare the model above, that was produced using Agisoft Photoscan to the below model produced in Autodesk Recap 360. The Autodesk is easier to use, you simply upload your images to the Recap 360 account and all the processing is done 'in the cloud' however there are very little options and settings that can be changed.

Small Construction Site - 3D Photomesh and Orthomosaic

Below is a 'stitched' photomosaic produced in Microsoft ICE, the program takes all the photos and stitches them together to create a large image of the area. The difference with this to the 3D models created is that usually the resolution and detail when zoomed in is much greater. Check it out below by clicking on the image and then zoom in.

Small Construction Site - 3D Photomesh and Orthomosaic

This has been another 'drone adventure' in aerial surveying, inspection and mapping by The Aero Scout.

Safety First

Safety First


Even though I am not a commercial UAV pilot, I still like to conduce myself in a manner that is both safe and professional. Whenever I am planning or conducting a 3D mapping mission with my drone, I like to use this set of guidelines.

Whilst the brochure above is produced by RPAS Training Australia, these are still guidelines set by the Australian Civil Aviation Safety Authority (CASA).