Slider

slide1

Drone Structure Scan - Derelict Cottage

Detailed 3D model of and old derelict cottage in Midvale.

slide2

Small Drone Mapping 101

The Aero Scout shares his experiences with drone mapping and 3D models.

slide3

Arthur River Mt Pleasant Kitchen - 3D drone structure scan

3D model of the heritage building Mt Pleasant Kitchen in Arthur River.

slide4

Chestnut Brae - Farm planning map in Nannup

Demonstrating how drone imagery can be used as a base for effective farm planning.

slide5

Drone Structure Scan - Heritage Lighthouse

Drone structure scan of the heritage South Mole Lighthouse in Fremantle.

Showing posts with label Tali H500. Show all posts

Drainage Channel - Asset Monitoring

Photo positions during a drone mission mapping a drainage ditch

Overview

  • Goal:  Using a drone and aerial photogrammetry to demonstrate how a drainage channel can be surveyed quickly and efficiently for monitoring
  • Tech: Walkera Tali H500 hexacopter drone, Gitup Git2, Tower app, Drone Deploy.
  • Conditions: Light winds, cloudy, cool
  • Outcome: Multicopter drones are a very effective way of surveying, monitoring and recording, in both 2D and 3D the current state of the drain. 

Monitoring utility assets such as a storm water runoff drainage channel is time consuming and expensive. You either have to use satellite (or manned aircraft) imagery which suffers from low resolution and 'timeliness' or you have to send a ground team to walk the full length of the asset and make notes.

In theory, with drone imagery and a service such as Drone Deploy, a one man team can be sent to the field to fly and survey the asset at low altitude. This not only yields a current/up-to-date map in high resolution it has the capability to deliver a 3D model as well.

So I thought I'd put it to the test and headed out during a lunch break with my trusty Tali H500 hexacopter with Gitup Git2 action camera to see how well a drone could produce imagery and then create both a 2D and 3D maps in Drone Deploy.


If you can see the map above, click this link to view in new window; View map here.

You can also view a 3D model of the drain below. Click on the viewer, give it a moment to load and then enjoy moving around a virtual 3D model.


The imagery can also be exported from Drone Deploy to other 'more capable' GIS software packages. From there, and with multiple flights over any given period of time, more sophisticated monitoring can be applied.

This has been another 'drone adventure' in aerial surveying, inspection and mapping by The Aero Scout.

Drone Deploy vs Google Earth Pro

Drone Deploy vs Google Earth
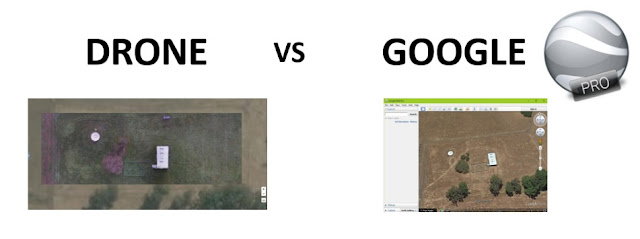
A comparison of drone imagery to Google Earth Pro imagery

Mission Summary

  • Goal: To compare Google Earth Pro to Drone Deploy 
  • Tech: Walkera Tali H500 hexacopter drone, Gitup Git2 actioncam, Tower app, Drone Deploy
  • Conditions: Early arvo, Windy, Scattered cloud
  • Outcome:  Drone Deploy gives more features to use on a higher resolution map when compared to Google Earth Pro.

I thought I'd follow up the previous article comparing drone imagery with Google maps with a new comparison of the features in Drone Deploy and Google Earth Pro.

Google Earth Pro recently became a free service and is widely been used as an excellent 'planning tool' for making basic measurements of distance and area based on aerial imagery.

Find below examples of drone imagery I had taken of the shearing shed on the farm turned into a 2D map created with Drone Deploy from a survey I made using my Tali H500 hexacopter with Gitup Git2 action camera. I'll compare this imagery to Google Earth Pro at the same location.

Drone Deploy vs Google Earth
View of the shearing shed from 2D map in Drone Deploy created using drone images.


Drone Deploy vs Google Earth
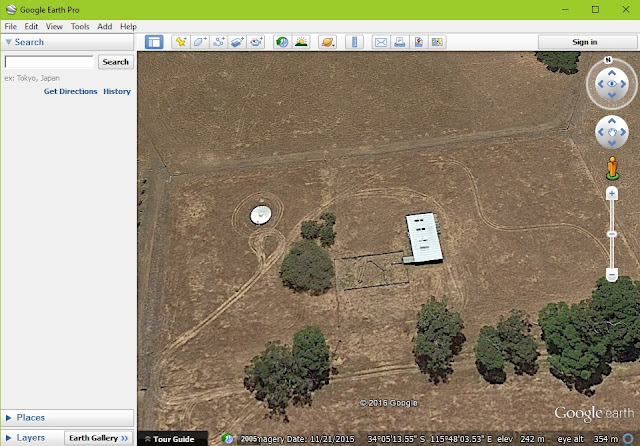
View of the shearing shed from Google Earth Pro, note the level of detail is not the same as drone images above.


Drone Deploy vs Google Earth
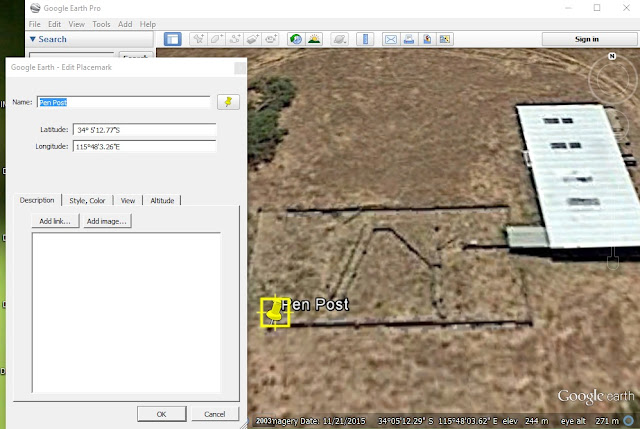
One of basic tools is the 'marker' . Add a note of use it to get GPS co-ords of a small point.

Drone Deploy vs Google Earth
Google Earth Pro's version of the same marker tool. Does the same job, it's just harder to place on a small object.


Drone Deploy vs Google Earth
Measure distance between two or more objects in Drone Deploy 

Drone Deploy vs Google Earth
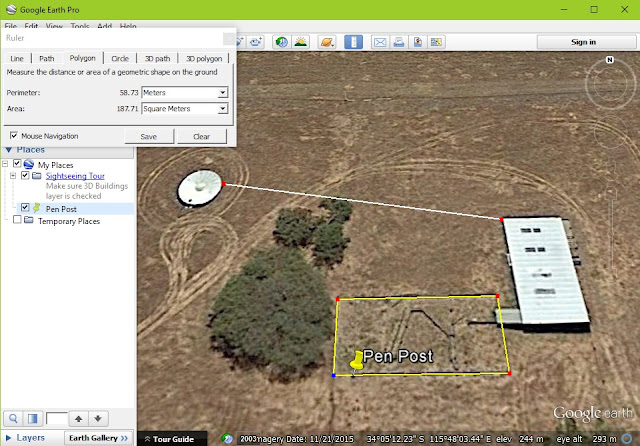
Measure distance between objects in Google Earth Pro


Drone Deploy vs Google Earth
Measure area in Drone Deploy

Drone Deploy vs Google Earth
Measure area in Google Earth Pro

Drone Deploy vs Google Earth
Screen showing multiple annotations in Drone Deploy.
The above are the most basic tools from Drone Deploy and the majority of the tools available in Google Earth Pro. You'll noticed that not only are the drone images used in Drone Deploy are of a higher resolution (meaning you can zoom in closer) but it is also a current map. The drone images were taken only a week ago, I'd say that the Google Earth Pro images would have been taken 6 months ago.

See below for extra features available in Drone Deploy.

Drone Deploy vs Google Earth
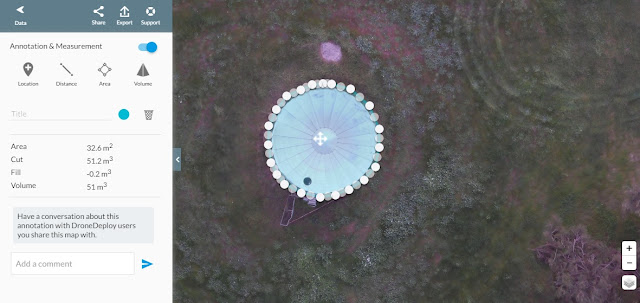
Volumetric tool, not the best example of how to use it but the only applicable one for this mission.

Drone Deploy vs Google Earth
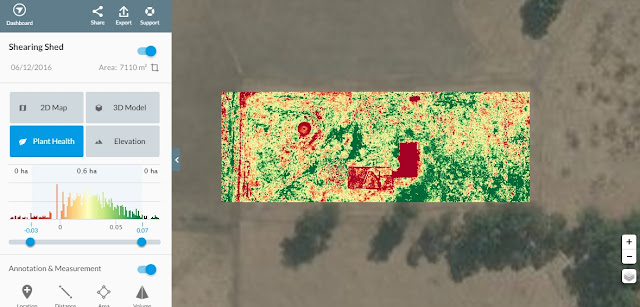
The 'Plant Health' tool (in this example) is based on RGB images and therefore not as sensitive as other methods, but still a useful tool.


Drone Deploy vs Google Earth
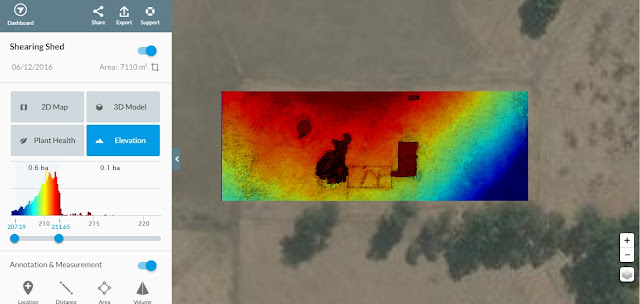
The 'Elevation' tool gives a colour gradient to heights on the map. A contour tool will hopefully be added as a feature sometime soon too.


Drone Deploy vs Google Earth
A 3D model is also generated, great for getting a better understanding of the area mapped.
It's not hard to see that whilst Google Earth Pro has some great 'basic' features, Drone Deploy has many more tools that really turn an online map into a functional planning tool.

This has been another 'drone adventure' in aerial surveying, inspection and mapping by The Aero Scout.

Drone Imagery vs Google Maps

A comparison of drone imagery to Google maps imagery

Mission Summary

  • Goal: To compare Google maps images to drone images 
  • Tech: Walkera Tali H500 hexacopter drone, Gitup Git2 actioncam, Tower app, Drone Deploy
  • Conditions: Early arvo, Windy, Scattered cloud
  • Outcome:  It's easy to see that drone imagery provides higher levels of detail compared to Google imagery.

I've heard the question a few times before; "What's the advantage of using drone (small scale, low altitude aerial imagery) over using Google maps or satellite imagery?"

The other day, I had just finished processing some imagery I had taken of the shearing shed on the farm and it was suddenly very obvious to me that I had the answer to the above question. Below you'll see a series of images of a 2D map created with Drone Deploy from a survey I made using my Tali H500 hexacopter with Gitup Git2 action camera.

Summary screen from Drone Deploy of mapped area and the surrounding area in Google maps

A closer look at the difference in the imagery. Check out the details of the map on the left side.

It's easy to see detail in the shed, pen, parked car, trees and water tank. This was only on half zoom.

The detail from Google maps of the same area around the shearing shed, pen, trees and water tank.
Not all of Google maps imagery is from a satellite, more and more of it is being updated with manned aerial photography, especially in the populous areas. Around the cities resolutions can get around 20cm/pixel but it rural areas this resolution can often drop to around 50cm/pixel. As you can also see from the images above, other major drawback is the 'timeliness' of the imagery. You don't know when it was taken and often Google imagery can be months if not years old.

Drone imagery on the other hand is 'real time', with turn around times of hours or days between taking the images and delivering the map. Also, because drones fly low (under 100m) the detail in the images can be very high (2cm/pixel).

In my next article I'll look at comparing these two sources of aerial maps and how easy it is to use them for a basic 'planning' map.

This has been another 'drone adventure' in aerial surveying, inspection and mapping by The Aero Scout.

Shearing Shed - Drone images to Point cloud and 3D Revit model

Autodesk Recap 360 point cloud imported into Autodesk Revit 2016

Mission Summary

  • Goal:  Using a drone and aerial photogrammetry to demonstrate Recap 360 to Revit interoperability
  • Tech: Walkera Tali H500 hexacopter drone, GoPro Hero 4, Droid Planner 2, Autodesk Recap 360, Autodesk Revit, Event 38 DDMS.
  • Conditions: Light winds, sunny, hot
  • Outcome: Recap 360 can produce a 3D model and then export it in a .RCS format for Revit to import it as a point cloud. The quality of the model and point cloud is very important for accurate modelling and documentation in Revit.
Tali H500 in front of shearing shed, the subject for this 3D mapping mission using Autodesk Recap 360 and Revit

Months ago I watched a video from Autodesk showcasing it's 'reality capture' technology, in that video they demonstrated a drone taking images then converting the images into a 3D model, then importing the 3D model into Revit to create an Architectural concept. I was facinated with the technology and excited about trying it out myself.

I found the perfect test subject, the shearing shed down on the chestnut farm. It's a nice easy shape and in a relatively clear area. So I got the Tali H500 out and mapped the structure using both nadir and oblique techniques.

Aerial view of shearing shed from a drones perspective

Once the aerial survey was complete the next step was to take the images and process them using Autodesk's Recap 360 online service. I've used this program previously and whilst it's easy to use I have found that it doesn't give excellent results, that is that I haven't been able to great results from it yet. Nevertheless I created a new project and set Recap 360 to work using both image datasets. you can see a few screenshots from the process below.
Recap 360 home screen showing projects completed ready for viewing and downloading of files  

Top view of shearing shed model created in Recap 360 from images taken from a drone

Mesh of shearing shed model created in Recap 360 from images taken from a drone showing the location and angle of original picture
Mesh of shearing shed model created in Recap 360 from images taken from a drone

Export options in Recap 360 once the 3D model has been created

I exported the finished 3D model as an .RCS file, Revit imports this as a point cloud. Once the point cloud is imported you have effectively got a 3D 'site survey' that you can view just like any other 3D object in Revit. The point cloud has also been scaled and placed accurately within Revit so all measurements and references are correct. A user can orbit around the point cloud, cut sections through it, create plan views displaying it etc. The idea, I guess, is you can use it as a reference for a building extension. You simple start modelling Revit elements up against or around the point cloud. See below some screenshots from views created in Revit showing the point cloud in action.

A 3D view of a point cloud created with images taken from  a drone, produced in Recap 360 and imported into Revit

A plan view of a point cloud created with images taken from  a drone, produced in Recap 360 and imported into Revit

Elevation view of a point cloud created with images taken from  a drone, produced in Recap 360 and imported into Revit

Section view of a point cloud created with images taken from  a drone, produced in Recap 360 and imported into Revit 

I also took this opportunity to run the images through another couple of other post processing services I have discovered.

You can see below the results of an orthomosaic created using the Event38 DDMS service.


Below is an orthomosaic that I had generated by MapsMadeEasy.com.  I haven't used their 3D model service as yet, but do like how well this map has been created and the public sharing features they have. Feel free to zoom in and out and scroll around to take a closer look at the map.


Also, find below the 3D model uploaded to Sketchfab. You can orbit this model plus zoom in and out. The quality is not as good as it is in the original form, but it's pretty close. You might have to give it a few moments to load all the textures. This model wasn't created in Autodesk Recap 360 it was created in Agisoft Photoscan on a medium setting. Even though it was created on a lower setting, I still think it is a crisper, more accurate model than that produced by Recap.


This has been another 'drone adventure' in aerial surveying, inspection and mapping by The Aero Scout.

Chestnut Brae - Orchard mappping


Mission Summary

  • Goal:  Scouting a chestnut orchard and producing an aerial orthomosaic map
  • Tech: Walkera Tali H500 hexacopter drone, GoPro 4 actioncam, Droid Planner 2, Photoscan and Microsoft ICE, Event38 DDMS
  • Conditions: Late afternoon, warm and 5 knots from south west
  • Outcome: It's difficult to produce an orthomosaic of an orchard, also, sloping ground makes it even tougher to create an accurate 3 model. GPS coordinates embedded into the EXIF data in the images is essential. 

For this project I'm experimenting with scouting and creating a basic orthomosaic map of a chestnut orchard. For this mission I am borrowing a mate's GoPro4 to see how it performs with the new Feiyu Tech 3D Pro gimbal.

An aerial view of the orchard about to be scouted with the Tali H500 

The flight plan created in Tower app for the aerial mapping mission of the chestnut orchard 


Stitched photos from GoPro to create this basic orthomosaic of the chestnut orchard

This has been another 'drone adventure' in aerial surveying, inspection and mapping by The Aero Scout.

Sports Oval - Orthomosaic

Finished orthomosaic of a sports oval created using images from a GoPro2

Mission Summary

  • Goal:  Create a basic 'stitched image' orthomosaic with hexacopter and GoPro2 action camera.
  • Tech: Walkera Tali H500 hexacopter drone, GoPro 2 actioncam, Tower app and Microsoft ICE
  • Conditions: Midday, hot, 15 knots easterly 
  • Outcome: Successfully completed mapping mission using Tali H500 hexacopter with Tower app for planning. Post processing orthomosaics with GoPro and Nokia images where of average quality. 
This is the first mapping mission I completed with my new Tali H500 hexacopter. I did all the planning using the 3DR Tower app which worked great, no need to lug my laptop to the field now. The Tali dealt with the hot and windy conditions well although the flight time was a little shorter than I was hoping, probably because of the new LiPo battery. GoPro 2 images were fine and the post processing stitching was ok using Microsoft ICE.

Tali H500 and F12E controller ready for a mapping mission over a sport oval 

Using the 3DR Tower app for flight planning a survey mission with 80% overlap of images.

This has been another 'drone adventure' in aerial surveying, inspection and mapping by The Aero Scout.

A new Aero Scout - Walkera Tali H500

The new Aero Scout, a Walkera Tali H500 and it's Devo F12e controller in the field
I'm very excited to announce that a new Aero Scout has arrived, it's a brand new Walkera Tali H500 hexacopter. This is going to give me the ability to conduct aerial missions in hotter, higher and windier conditions than my previous quadcopter. It is also capable of carrying a greater payload, typically 600g, which means I can use different cameras/sensors such as a compact camera or a FLIR camera.

Hexacopters are exciting, and I believe, we'll see more of them as the multicopter drone industry develops. The main reason is that they are safer and the Authorities are keen to see safer drones being manufactured. The extra motors mean that if one motor failed (and theoretically even if two motors failed) then the flight controller would be able to maintain stable flight long enough for the pilot to bring the aircraft down for a safe landing. Not that quadcopters have a tendency to always fall from the sky, but with only four motors there is no room for a malfunction. Regular maintenance checks certainly helps, however some components are some small that a pilot is unlikely to spot any problems.

The other bonus that a hexacopter delivers is the ability to lift more weight. I'm looking forward to having more options on the size, quality and type of camera/sensor that I can use. For now that will most probably be a GoPro style actioncam on a 3 axis gimbal, however in the future I'd like to have a  FLIR camera for spotting and mapping temperature gradients or hotspots. A compact camera would be very useful for higher resolution maps and 3D models , you can purchase modified cameras (NDVI) that filter certain light waves to make it easier to determine plant health or crops. There's lots of new options now available for me to explore.

For now though, I'm just familiarising myself with the new airframe, it's very different to my last quadcopter the QR X350 Pro. It has alot more power, hovering with no payload at 25% throttle and is also a lot faster. I'll be spending a few weeks just honing my basic flying skills with this new airframe before I add a gimbal and camera and start running mapping missions.

First flight with the Tali H500 plus basic test FPV system.

A big thanks to Walkera for it's generosity in sponsoring the Aero Scout and supplying this air system at a discounted price.  I have always had a good experience with dealing with Walkera and own (and have owned) a handful of their drones, all of which are excellent and I treasure very much.

This has been another 'drone adventure' in aerial surveying, inspection and mapping by The Aero Scout.