Slider

slide1

Drone Structure Scan - Derelict Cottage

Detailed 3D model of and old derelict cottage in Midvale.

slide2

Small Drone Mapping 101

The Aero Scout shares his experiences with drone mapping and 3D models.

slide3

Arthur River Mt Pleasant Kitchen - 3D drone structure scan

3D model of the heritage building Mt Pleasant Kitchen in Arthur River.

slide4

Chestnut Brae - Farm planning map in Nannup

Demonstrating how drone imagery can be used as a base for effective farm planning.

slide5

Drone Structure Scan - Heritage Lighthouse

Drone structure scan of the heritage South Mole Lighthouse in Fremantle.

Drone Imagery vs Google Maps

A comparison of drone imagery to Google maps imagery

Mission Summary

  • Goal: To compare Google maps images to drone images 
  • Tech: Walkera Tali H500 hexacopter drone, Gitup Git2 actioncam, Tower app, Drone Deploy
  • Conditions: Early arvo, Windy, Scattered cloud
  • Outcome:  It's easy to see that drone imagery provides higher levels of detail compared to Google imagery.

I've heard the question a few times before; "What's the advantage of using drone (small scale, low altitude aerial imagery) over using Google maps or satellite imagery?"

The other day, I had just finished processing some imagery I had taken of the shearing shed on the farm and it was suddenly very obvious to me that I had the answer to the above question. Below you'll see a series of images of a 2D map created with Drone Deploy from a survey I made using my Tali H500 hexacopter with Gitup Git2 action camera.

Summary screen from Drone Deploy of mapped area and the surrounding area in Google maps

A closer look at the difference in the imagery. Check out the details of the map on the left side.

It's easy to see detail in the shed, pen, parked car, trees and water tank. This was only on half zoom.

The detail from Google maps of the same area around the shearing shed, pen, trees and water tank.
Not all of Google maps imagery is from a satellite, more and more of it is being updated with manned aerial photography, especially in the populous areas. Around the cities resolutions can get around 20cm/pixel but it rural areas this resolution can often drop to around 50cm/pixel. As you can also see from the images above, other major drawback is the 'timeliness' of the imagery. You don't know when it was taken and often Google imagery can be months if not years old.

Drone imagery on the other hand is 'real time', with turn around times of hours or days between taking the images and delivering the map. Also, because drones fly low (under 100m) the detail in the images can be very high (2cm/pixel).

In my next article I'll look at comparing these two sources of aerial maps and how easy it is to use them for a basic 'planning' map.

This has been another 'drone adventure' in aerial surveying, inspection and mapping by The Aero Scout.

Small Drone Aerial Mapping 101

Small drone mapping

Drone mapping is an awesome hobby to get into, you get enjoy the outdoors, try different flying locations all the time and use the technology to produce useful, actionable deliverables. It's not always a pleasurable experience, most of the time it's a real challenge but that's what sets it apart from normal RC flying and that's why I love it.

I am by no means and expert in any of the below areas - I just like to consider myself a 'drone enthusiast', and as such I'm sharing some of my experiences so that new comers to the hobby may get into it faster, with less hassles and more successes.

There are four main factors to consider:
  • Air frame
  • Sensors
  • Flight Planning
  • Image Processing

I'm not going to pitch this article at a reader that knows nothing about RC or drones, this is focused on the hobbyist or prosumer that is interested in doing aerial mapping and has some understanding of drones, model flight and the regulations in your region.

Small drone mapping
View from my hexacopter doing a mapping mission of the family's chestnut farm

Small Drone Mapping - Airframe

When most people think of making a decision on an air frame they usually think along the lines of air frame type, i.e fixed wing vs. multi rotor. Each air frame certainly has its differences as well as some very distinct pros and cons. I'll give you an overview of them below. Also, once you have decided on the type of air frame another important decision to make is whether to build or buy. As an addendum to this article I've included my thoughts on this topic.

Multi rotors are generally more expensive with shorter flight times, however they will produce a more detailed map (albeit smaller) because they can fly lower, slower and usually with a lot more stabilisation for the camera. The big players in the consumer multi copter game currently are DJI Phantom, 3DR Solo, Yuneec Typhoon H and Walkera Tali H500. Any one of these products will give you most of the tools you're going to need to create great aerial maps. Other great features of multi copters is that they take-off and land vertically therefore can be flown in tighter places, they are often very compact and are easily transported and they have built in safety features (such as GPS hover) that make them very easy to fly.

Fixed wing mapping drones almost always have longer endurance than their multi rotor counterparts, the down side to a fixed wing is generally they are harder to fly and need a larger take-off/landing area. There are of course exceptions to all of these (the Sensefly eBee is fully autonomous and needs no flying experience) however as a general rule for fixed wing drones the user needs to be able to take-off and land them, with the autopilot doing everything in between. Fixed wing drones can be less expensive than multi rotor, however most fixed wing drones are targeted to the professional user (the Parrot Disco would be the only prosumer fixed wing drone I know of at time of writing) and are therefore equipped with more a robust air frame and superior sensors. However it's certainly possible to build your own prosumer grade fixed wing drone for around $600 with a bunch of plug-n-play hobbyist quality parts.  

So to give you some real world mapping examples, if you wanted to produce a topographic map of Farmer Brown's 60 hectare property, you could do it with a multi copter (if you had about 2hrs and 6 spare batteries) or you could do it with a fixed wing in one 20min flight! This will produce a nice orthomosaic (aerial image) as well as give you elevations/contour lines however if you want to send him a 3D model of the property then the trees will look like rubbish and the structures will look ok. This is because you are only getting a nadir (top down) view and the post-processing software can only do so much with a top down view when generating a 3D model.

Now let's go and see Builder Joe to create a site survey of his 5 hectare job site. Try doing this with a fixed wing and you'll not only find that the 3D model is not that good (because above mentioned reason) but also you'll fly the mission in about 1min. You'll also find it impossible not to overfly onto the neighbour's property and very difficult to take-off and land. However vertically popping up your multi rotor, taking oblique images with your gimbal stabilised camera using the 'structure scan' auto mission built into most mission planners and you'll be done in about 15min. This will produce a very accurate 3D model, even just using an action camera such as a GoPro.
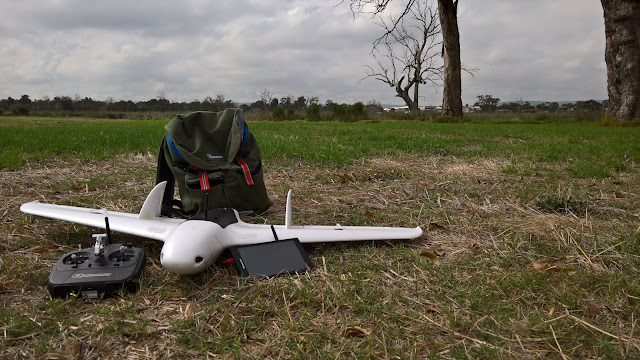
Small drone mapping
Aero Scout fixed wing drone with controller plus tablet for mission planning

Small Drone Mapping - Sensors

At this stage drone mapping is all about photogrammetry, there are technologies such as LIDAR that are increasing the capabilities of small drones however at the moment they are still limited in range and are heavy (needing a larger air frame to lift them), high quality cameras are producing very good results.

Action cameras such as the GoPro are 'ok' for aerial mapping. Whilst being light and relatively cheap, their short comings are that they have lower resolution (around 12Mp), low shutter speeds (1/30 sec), image distortion from the fish-eye lens and have what's called a 'rolling shutter' which the post-processing programs don't particularly like so much. With all of that said, mount one to a gimbal for stabilisation, fly them slow on a multi copter and lower to the ground and they can produce excellent prosumer grade results.

The big guns in mapping are the compact cameras such as Canon Powershot S120 and Sony Cybershot WX500. They are heavier than action cams and need larger gimbals (if mounting on multi rotor) however they have high resolutions (16Mp +) and very high shutter speeds, this means they can be used in fixed wing air frames moving fast and low to the ground and still produce high quality, blur free images.  The results from using a sensor such as a good quality compact camera will usually be of a professional standard. Also (for Canon users) there is an excellent 'hack' called CHDK that unlocks a bucket load of extra features from the camera that make them great aerial mappers.

One of them is an intervelometer, this is basically a timer that makes the camera take a photo every 2 sec (or 5 or 10 etc) for as long you like, this is a feature that usually does not come with the camera. Taking aerial photos using this kind of method is simple and effective but does have it's shortcomings. If the camera is taking photos based on a time interval then you will end up with more photos on your up-wind leg (because the aircraft has a slower ground speed) and more on your downwind leg. As long as you have sufficient overlap then it's not a big problem but there is a better way. CHDK also allows the autopilot to talk to the camera so it can trigger the shutter based on distance. So with this method, regardless of the ground speed, you will end up with a photo taken every 50m or 70m or whatever you program. This will result in a more even spread of photos across your mission area.

Once you have mastered 'visual light' cameras you'll most likely want to start expanding on your offering by looking into other sensors such as multi-spectral, LIDAR and thermal imaging cameras. These have many uses and seem to be expanding exponentially, examples such as crop health monitoring, structural scanning, infrastructure inspection and emergency first responders are just some of the applications. Checkout sensor providers such as MapIR, Sensefly Sequoia and Workswell for more information on these sensors. Also DJI and 3DR are just bringing to market turnkey solutions with their products.

Small drone mapping
Walkera Tali H500 with GoPro 4 mounted on a 3 axis stabilised gimbal, ready for a structure scan

Small Drone Mapping - Flight planning and Mission Execution

The methodology is where each individual pilot gets to showcase their abilities; this is where the most variables occur and where a skilful mapping pilot will shine.

Most flight planning software does the same job, it enables the user to program a flight path for the drone to follow during it's auto-mission. The main feature to be looking for is the ability to easily produce a survey grid based on an outline or polyline. I've used Mission Planner, APM Planner 2.0 (which is available on both PC and Mac) as well as Droid Planner and 3DR Tower apps. For highly detailed planning I'd recommend using one of the desktop based planners, they simply have more features. But I mostly use Tower app, as it has enough features for what I need, it very simple and streamlined to use and is an app so it works on a tablet/smartphone which I find much more convenient to use in the field.

The fundamentals of photogrammetry are to always get a decent overlap on all your images; you need forward lap as well as side lap for the post-processing program to be able to function correctly. Generally you should have 60 percent overlap both ways as a minimum. If you decide you want extra forward lap then increasing the rate at which the shutter is released (take a photo more often), or fly slower. If you want more side lap then you'll need to fly a grid pattern with less distance between each grid line, this will mean a longer flight but more detail in the end result.

Those are the fundamentals, but each mission is different and usually in a different location. There's many other factors that need to be managed and decisions made; best take-off and landing site (both multi rotor and fixed wing need this although have different requirements), best vantage point to able to watch the drone fly it's auto-mission (you need to be able to see it at all times). Authority regulations, no-fly-zones, obstacles all need to be considered, plus optimising the flight plan due to weather conditions.

Geotagging your images is the next most important step. You can do this by using a camera that already has a GPS built-in (however they are heavy and lack a few basic features) or you can use a GPS logger to record and log the flight. What most drone mappers do though is use the logs from the flight controller's GPS and sync them with the photos taken. It's a tricky and tedious extra step that needs to be taken but there are a number of geotagging tutorials that will walk you through the process. For extra accuracy, and if you have the equipment, you can also add GCP's or ground control points to your map. With the right gear this means you can take your map that might have an accuracy of 5-10cm right down to 1cm which is right up there with professional surveying.

Small drone mapping
Using Tower app for flight planning ... note my overlap should be more!

Small Drone Mapping - Image Processing

Of course the original images are what is going to make your end result. A more stable air frame, a higher quality sensor and good methodology will give you the best chance of producing something high quality, but the real magic is what happens during the image processing phase.

There are some great programs to choose from and there's new ones starting up all the time. Some of the well known ones are Agisoft Photoscan, Drone Deploy, Maps Made Easy, Pix4D and DDMS. I've used them all for various missions but right now I use Event 38's DDMS for producing my maps. I find it very easy to use, produces some of the best maps and has a free trial.
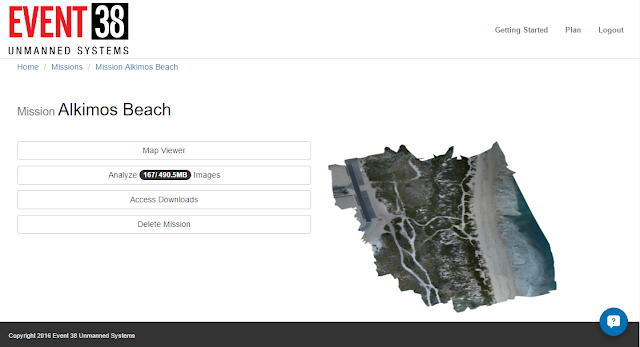
Small drone mapping
Dashboard screen in DDMS showing details on aerial mapping mission
For me the big decision for post-processing is whether to do it on my laptop, locally or upload it to a remote service.

For some of my missions I have been in a location with no Internet connection, this is where a local program installed on a laptop enabled me to process the missions' images and create both an orthomosaic and 3D model. Also I have had incidents where I have been able to produce a better 3D model using a trial version of Agisoft Photoscan than that the remote services could offer.

The remote services though are very easy to use, once you have uploaded the images the rest of the work is done for you, this also means you can process multiple missions from the day all at once. Often I have been delighted to see a finished 3D model waiting for me in the morning after uploading the night before.

Small drone mapping
A 3D model of a primary school that was generated in Agisoft Phoscan and uploaded to Sketchfab


So I'm hoping that the above information is going to be of assistance, I found that there's a great deal to learn with aerial mapping and I've tried to pass on as much as I can with this article.

A lot of the links I have provided in this article are to the more popular and well marketed service providers in the industry. I do encourage you to seek out other drone businesses that can help you on your journey; there are plenty out there.
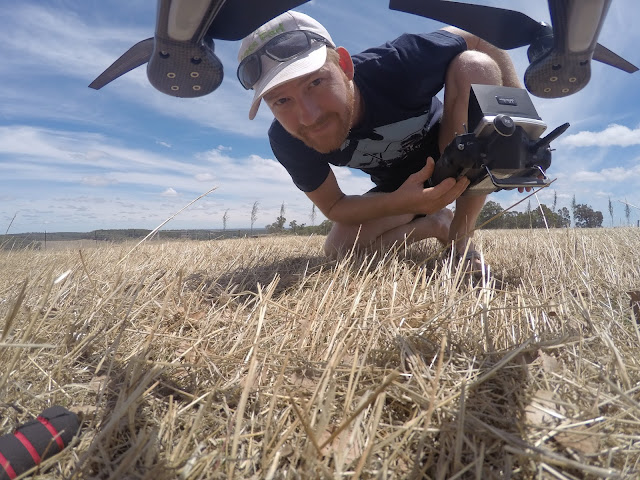
Small drone mapping The Aero Scout
The Aero Scout performing pre-flight checks
This has been another 'drone adventure' in aerial surveying, inspection and mapping by The Aero Scout.

------------------------------------------------------------------------------------------------------------------------------------------------------------------

Time is Money

At the start of this article I promised to give some insight into whether to buy or build your own drone. I have experience with both, purchasing my Walkera Tali H500 and building my own fixed wing drone.

With the skills I learnt setting up my hexacopter, using mission planner and flying multi copter drone missions gave me the confidence to build my own drone. Because of the shortcomings of the multi copter I decided to build a fixed wing drone, this has cost me a fraction of what it would cost me to purchase a fixed wing drone from someone such as Event 38 or 3DR. However it has taken me 10's of hours to build it, test it and develop it, even though I purchased and installed 'plug-n-play' parts and had a good understanding of the process. This equates to weeks and months of building and testing, at times it has been a slow and frustrating journey where all I wanted was to be able to map, instead of problem solve technical issues.

So my recommendation would be to think very hard about purchasing or building a drone yourself. Building your own drone will cost you a lot less money (as long as you don't crash too many air frames during testing) and you'll learn a lot more about the technical workings of a drone. Purchasing will cost you more money but you'll be up and running and mapping sooner, you will have a refined and reliable system that produces results right away. Decide on what you are 'most poor' at, time or money.

The downside to building and testing your own drone

A new fixed wing Aero Scout - Hobbyking Skyray


The brand new fixed wing Aero Scout, the Skyray, with APM 2.6 plus telemetry and tablet running Tower app mission planner
The time has come to spread my wings further. :)

Now I just love my Tali H500 however it's very limiting with it's endurance. I'm lucky to get 15min flight time out of one battery and with it flying mapping missions at around 5m/s this does not enable me to map larger areas, somewhere around 5 hectares. So I'll keep using it, but more of a 'structure scanner' for doing low altitude, high detail, 3D models of buildings, it's perfect for that.

This time instead of purchasing a RTF 'ready to fly' system I decided to build my own. I did purchase an airframe from Hobbyking called the Skyray, it's a flying wing style created for FPV. I discarded the dome and installed the optional foam nose, I then installed an old APM 2.6 I had lying around that I purchased from Jeff at Event 38 a few years ago. After some bench testing and a couple of basic test flights at the flying field I installed a Canon compact camera, hacked with CHDK to get an intervelometer script working to take a photo every 2 seconds. I've added a 3DR telemetry radio and this communicates well with Tower app installed on my Android tablet. It's very easy to program survey grid waypoints for automatic missions and it's great to receive feedback from the drone in real time on the map screen and dashboard. Now I have a compact and rugged flying wing UAV with a 20Mp camera that flies like a dream and is all setup for some basic mapping.

I have taken it down to the farm for run a few field tests and it worked like a charm. On all of the days is was gusty and moist, on one of the days I flew it in-between showers from a storm and I was very impressed. It's even survived a close encounter with two Wedgetail Eagles that were'nt suuper impressed with it flying in their region.

I look forward to furthering my mapping adventures with this new fixed wing drone and I look forward to bring you some great maps and 3D models.

This has been another 'drone adventure' in aerial surveying, inspection and mapping by The Aero Scout.

Shearing Shed - Drone images to Point cloud and 3D Revit model

Autodesk Recap 360 point cloud imported into Autodesk Revit 2016

Mission Summary

  • Goal:  Using a drone and aerial photogrammetry to demonstrate Recap 360 to Revit interoperability
  • Tech: Walkera Tali H500 hexacopter drone, GoPro Hero 4, Droid Planner 2, Autodesk Recap 360, Autodesk Revit, Event 38 DDMS.
  • Conditions: Light winds, sunny, hot
  • Outcome: Recap 360 can produce a 3D model and then export it in a .RCS format for Revit to import it as a point cloud. The quality of the model and point cloud is very important for accurate modelling and documentation in Revit.
Tali H500 in front of shearing shed, the subject for this 3D mapping mission using Autodesk Recap 360 and Revit

Months ago I watched a video from Autodesk showcasing it's 'reality capture' technology, in that video they demonstrated a drone taking images then converting the images into a 3D model, then importing the 3D model into Revit to create an Architectural concept. I was facinated with the technology and excited about trying it out myself.

I found the perfect test subject, the shearing shed down on the chestnut farm. It's a nice easy shape and in a relatively clear area. So I got the Tali H500 out and mapped the structure using both nadir and oblique techniques.

Aerial view of shearing shed from a drones perspective

Once the aerial survey was complete the next step was to take the images and process them using Autodesk's Recap 360 online service. I've used this program previously and whilst it's easy to use I have found that it doesn't give excellent results, that is that I haven't been able to great results from it yet. Nevertheless I created a new project and set Recap 360 to work using both image datasets. you can see a few screenshots from the process below.
Recap 360 home screen showing projects completed ready for viewing and downloading of files  

Top view of shearing shed model created in Recap 360 from images taken from a drone

Mesh of shearing shed model created in Recap 360 from images taken from a drone showing the location and angle of original picture
Mesh of shearing shed model created in Recap 360 from images taken from a drone

Export options in Recap 360 once the 3D model has been created

I exported the finished 3D model as an .RCS file, Revit imports this as a point cloud. Once the point cloud is imported you have effectively got a 3D 'site survey' that you can view just like any other 3D object in Revit. The point cloud has also been scaled and placed accurately within Revit so all measurements and references are correct. A user can orbit around the point cloud, cut sections through it, create plan views displaying it etc. The idea, I guess, is you can use it as a reference for a building extension. You simple start modelling Revit elements up against or around the point cloud. See below some screenshots from views created in Revit showing the point cloud in action.

A 3D view of a point cloud created with images taken from  a drone, produced in Recap 360 and imported into Revit

A plan view of a point cloud created with images taken from  a drone, produced in Recap 360 and imported into Revit

Elevation view of a point cloud created with images taken from  a drone, produced in Recap 360 and imported into Revit

Section view of a point cloud created with images taken from  a drone, produced in Recap 360 and imported into Revit 

I also took this opportunity to run the images through another couple of other post processing services I have discovered.

You can see below the results of an orthomosaic created using the Event38 DDMS service.


Below is an orthomosaic that I had generated by MapsMadeEasy.com.  I haven't used their 3D model service as yet, but do like how well this map has been created and the public sharing features they have. Feel free to zoom in and out and scroll around to take a closer look at the map.


Also, find below the 3D model uploaded to Sketchfab. You can orbit this model plus zoom in and out. The quality is not as good as it is in the original form, but it's pretty close. You might have to give it a few moments to load all the textures. This model wasn't created in Autodesk Recap 360 it was created in Agisoft Photoscan on a medium setting. Even though it was created on a lower setting, I still think it is a crisper, more accurate model than that produced by Recap.


This has been another 'drone adventure' in aerial surveying, inspection and mapping by The Aero Scout.

Chestnut Brae - Orchard mappping


Mission Summary

  • Goal:  Scouting a chestnut orchard and producing an aerial orthomosaic map
  • Tech: Walkera Tali H500 hexacopter drone, GoPro 4 actioncam, Droid Planner 2, Photoscan and Microsoft ICE, Event38 DDMS
  • Conditions: Late afternoon, warm and 5 knots from south west
  • Outcome: It's difficult to produce an orthomosaic of an orchard, also, sloping ground makes it even tougher to create an accurate 3 model. GPS coordinates embedded into the EXIF data in the images is essential. 

For this project I'm experimenting with scouting and creating a basic orthomosaic map of a chestnut orchard. For this mission I am borrowing a mate's GoPro4 to see how it performs with the new Feiyu Tech 3D Pro gimbal.

An aerial view of the orchard about to be scouted with the Tali H500 

The flight plan created in Tower app for the aerial mapping mission of the chestnut orchard 


Stitched photos from GoPro to create this basic orthomosaic of the chestnut orchard

This has been another 'drone adventure' in aerial surveying, inspection and mapping by The Aero Scout.

Sports Oval - Orthomosaic

Finished orthomosaic of a sports oval created using images from a GoPro2

Mission Summary

  • Goal:  Create a basic 'stitched image' orthomosaic with hexacopter and GoPro2 action camera.
  • Tech: Walkera Tali H500 hexacopter drone, GoPro 2 actioncam, Tower app and Microsoft ICE
  • Conditions: Midday, hot, 15 knots easterly 
  • Outcome: Successfully completed mapping mission using Tali H500 hexacopter with Tower app for planning. Post processing orthomosaics with GoPro and Nokia images where of average quality. 
This is the first mapping mission I completed with my new Tali H500 hexacopter. I did all the planning using the 3DR Tower app which worked great, no need to lug my laptop to the field now. The Tali dealt with the hot and windy conditions well although the flight time was a little shorter than I was hoping, probably because of the new LiPo battery. GoPro 2 images were fine and the post processing stitching was ok using Microsoft ICE.

Tali H500 and F12E controller ready for a mapping mission over a sport oval 

Using the 3DR Tower app for flight planning a survey mission with 80% overlap of images.

This has been another 'drone adventure' in aerial surveying, inspection and mapping by The Aero Scout.

A new Aero Scout - Walkera Tali H500

The new Aero Scout, a Walkera Tali H500 and it's Devo F12e controller in the field
I'm very excited to announce that a new Aero Scout has arrived, it's a brand new Walkera Tali H500 hexacopter. This is going to give me the ability to conduct aerial missions in hotter, higher and windier conditions than my previous quadcopter. It is also capable of carrying a greater payload, typically 600g, which means I can use different cameras/sensors such as a compact camera or a FLIR camera.

Hexacopters are exciting, and I believe, we'll see more of them as the multicopter drone industry develops. The main reason is that they are safer and the Authorities are keen to see safer drones being manufactured. The extra motors mean that if one motor failed (and theoretically even if two motors failed) then the flight controller would be able to maintain stable flight long enough for the pilot to bring the aircraft down for a safe landing. Not that quadcopters have a tendency to always fall from the sky, but with only four motors there is no room for a malfunction. Regular maintenance checks certainly helps, however some components are some small that a pilot is unlikely to spot any problems.

The other bonus that a hexacopter delivers is the ability to lift more weight. I'm looking forward to having more options on the size, quality and type of camera/sensor that I can use. For now that will most probably be a GoPro style actioncam on a 3 axis gimbal, however in the future I'd like to have a  FLIR camera for spotting and mapping temperature gradients or hotspots. A compact camera would be very useful for higher resolution maps and 3D models , you can purchase modified cameras (NDVI) that filter certain light waves to make it easier to determine plant health or crops. There's lots of new options now available for me to explore.

For now though, I'm just familiarising myself with the new airframe, it's very different to my last quadcopter the QR X350 Pro. It has alot more power, hovering with no payload at 25% throttle and is also a lot faster. I'll be spending a few weeks just honing my basic flying skills with this new airframe before I add a gimbal and camera and start running mapping missions.

First flight with the Tali H500 plus basic test FPV system.

A big thanks to Walkera for it's generosity in sponsoring the Aero Scout and supplying this air system at a discounted price.  I have always had a good experience with dealing with Walkera and own (and have owned) a handful of their drones, all of which are excellent and I treasure very much.

This has been another 'drone adventure' in aerial surveying, inspection and mapping by The Aero Scout.

March of the drones: 10 ideas that moved flying robots forward in 2015


Article by Nick Lavars published on GizMag.com

Drones have continued to capture our imagination in remarkable ways throughout 2015. Despite the thick layers of bureaucracy that outlaw commercial use in much of the world, fresh ideas itching to put the technology to use constantly come to the fore. Let's cast our eye over some of the more promising to emerge this year; a diverse list that includes everything from drones that deliver medical supplies to drones that can build bridges all by themselves.

Click here to read original article on GizMag.com .....

DJI P3 vs Walkera Tali H500

DJI P3 vs Walkera Tali H500
Lets compare the Phantom 3 to the Tali H500 for aerial 3D mapping
As you probably would have read in my previous post, I crashed/lost my Walkera QR X350 Pro, which I had successfully operated for over 18 months. Learning from my experience, I'm now wanting to replace this drone with something more capable. The number one consumer drone is the Phantom 3, that said there's some pretty good deals to be found right now on the Walkera Tali H500. I thought an 'informal' comparison between the two, written down in this blog, would assist me in my decision making and help me to arrive at the most suitable choice to fulfill my needs..

There's little doubt that the Phantom 3 Pro and Advance quadcopters are considered some of the best  aerial filming drones on the market right now and they are built by the largest drone manufacturer in the world DJI. Their level of sophistication and the integration of their systems is unmatched, they are brilliant, high end consumer drones.

The Tali H500 on the other hand is not as well known or popular as the P3. It's a hexacopter built by Walkera and has mixed reviews from users. Some say it's a dud but many others say it's a very reliable and flexible and still has room for growth and development as an airframe. It comes with the industry standard autopilot installed and a controller handset that has a built in screen for viewing live video and telemetry.  

See below my comparisons on these two excellent drones., but do understand that my comparison is from a 3D mappers point of view. My interest and passion lies in aerial surveying and post processing 3D map and model creation. Whilst this 'drone discipline' shares many attributes of aerial filming style of drone operations, it is also has some very different requirements. Do read on .......

Stability and safety

One of the main factors to my QR X350 Pro crashing was the hot, windy conditions. This has made me look for a larger, more redundant airframe such as a hexacopter. With a quadcopter if a motor fails then the aircraft will crash instantly. With a hexacopter, if one (and sometimes even two) motors fail then there is a very good chance it can still be controlled back to pilot safely.


P3 AdvTali H500
  • Four motors = no redundancy if component fails, quad crashes!
  • Excellent quality record
  • Ok stability in windy conditions
  • Six motors = safe landing if components fail 
  • Quality control has been an issue for some customers
  • Excellent stability in high winds

Payload

The P3 is all about integration and ease of use. The downside to this is that the user cannot swap the camera over for another. Being a quadcopter is is also very restricted in it's lifting capacity, somewhere around 200g is about all an airframe of it's size can carry.

The Tali H500 hexacopter on the other hand, whilst is not considered a heavy lifter, can lift much more than a quadcopter, more like 500-700g. The other factor is that because the airframe is independent to the camera, the Tali can 'swap out' it's payload anytime. The user can choose what gimbal and what camera he/she wishes to use. For a 3D mapper this means that a GoPro can be used, a modified GoPro with a specialised lens, or even a compact camera. It also means that a 2D or 3D gimbal can be sued depending on what is required for the mission.


P3 Adv Tali H500
  • Can't change payload
  • Around 500-700g payload
  • Change to a 360 gimbal with latest GoPro
  • Add a Walkera G3-S gimbal to carry Sony RX100 camera (professional quality filming and mapping) 


Flight time

The Phantom 3 has a slightly longer flight time than the Tali H500. About 24min is what I have read where the Tali H500 seems to be getting 18-20min depending on who you speak to. For mapping the advantage here is that a longer flight time means a larger area can be surveyed on one battery.


P3 Adv Tali H500
  • 20-25min
  • 18-20min

Flight planning

DJI aren't really in the business of aerial mapping and their Go app does not support mapping features, however there are other companies that have created software to plug into the P3 range to make them a very good mapping tool. When you combine the P3 with a mapping service such as Drone Deploy suddenly it does become much more capable and very close to an absolutely fully integrated airframe/post processing package.

The flight controller in the Tali is based on Ardupilot, an open source autopilot and it uses a mature and feature rich ground station program called Mission Planner. Mission Planner has many, many mapping tools and is considered the industry standard. There's not much that a pilot cannot flight plan in Mission Planner. Also there is a tablet version with most of the functionality.


P3 Adv Tali H500

  • Go app virtually no mapping features
  • Drone Deploy is a professional grade mapping solution that is compatible with the P3
  • Mission Planner considered industry benchmark for UAV flight planning
  • Excellent mapping features built in
  • Can be used on a desktop or a tablet version


Telemetry

The Phantom 3 range of quadcopters have absolute integration of systems, the camera and gimbal are not 'add-ons', they are part of the drone. With the DJI Go app you can view the status almost all systems including the waypoints planned and the current waypoint the drone is heading to plus this can be changed and new waypoints can be added in real time. The other major benefit of the P3 is that is uses 'Lightbridge' for the video and telemetry. This means that the pilot can view all of this information in HD and on an HD Screen such as a tablet.

The Tali H500 (in this configuration) does not report the same level of telemetry, but it does have live telemetry and analog video signal out to a range of around 1km. On  the screen integrated into the controller the pilot can view the drones altitude, distance from home, GPS lock and battery voltage, it does not report waypoints or progress.


P3 Adv Tali H500
  • HD video downlink
  • Full telemetry inc altitude, vertical speed, airspeed, battery status, GPS lock plus waypoints and progress. New waypoints can be programmed in real-time.
  • Analog video (out to 1km)
  • Basic telemetry inc altitude, distance, battery status and GPS lock.

Camera capability

For aerial filming the P3 is pretty darn good, a 12MP still photo and 4K at 60fps videos, certainly as good as a GoPro, also the level of camera remote control is un-matched. For mapping what really sets the P3 apart is that the images are automatically geotagged, this is because the camera and flight controller are integrated. The downside to this is that you can't separate the drone from the camera, you can't add a more powerful sensor or change the type of sensor (well you can but it's very expensive) so you are limited in what you can expand the drone out to. For most pro-sumer aerial photographers there would be little need to upgrade or expand, however I'm not interested in filming, I'm focusing on the still images.

The Tali H500 does not have this level of integration of camera and flight controller and the camera cannot be controlled remotely from the pilots controller or ground station. That said, there are ways to 'add' the EXIF data to a GoPro image post flight so that the images are geotagged. The advantage the Tali has over the P3 is that it can be retro-fitted with other cameras, most noteably the Sony RX100. The Rx100 is considered an extremely good compact camera and won many awards. For aerial mapping is has a 20MB sensor, this results is much higher detail and accuracy for the final 3D map.


P3 Adv Tali H500
  • Full remote camera control
  • Tilt ony gimbal control
  • No provisions for dual operator


  • No camera control for GoPro
  • Expandable to RX100 with limited camera control 
  • Full 360 gimbal control
  • Ability to be dual operated (pilot and cameraman) 

Price

I am in a fortunate position where I have contacts in the industry and I can get some good deals on both these airframes.


P3 Adv Tali H500
  • AUD$1800
  • Inc spare battery, backpack, gimbal, camera
  • Does not include tablet for viewing video and telemetry
  • AUD$1500
  • Inc spare batttery, case, 360 gimbal and camera
  • Inc handset controller with screen for video and telemetry


If my focus was aerial filming then I think the Phantom might have a slight edge over the Tali. It's limited with it's payload capability and for it's expandability, however it makes up for it in it's systems integration, it's HD video link and it's portability.

But for my interests though, in 3D aerial mapping, those features are not as important as the safety benefits and the payload capacity of a hexacopter plus the expandability that the Tali H500 will give me to help future proof the airframe and facilitate me increasing my skills.

For me, I think I'll be grabbing a Tali H500 very soon to replace my lost, but not forgotten, QR X350 Pro quadcopter.

This has been another 'drone adventure' in aerial surveying, inspection and mapping by The Aero Scout.

Last flight of the X350 Pro

Last flight of the X350 Pro
This is not my drone, I've just used this picture for emphasis, my drone is at the bottom of a winter lake.
Today was a sad day for The Aero Scout, I lost my Walkera X350 Pro in a wetlands lake. The short story is that it splashed down into the middle of the lake, never to be seen again due to a low battery .... the long story is as follows.

I knew this was going to be a challenging mission, the plan was to map a medium sized wetlands lake in Viveash. The area to be mapped was 120,000m2 (nearly 30 acres), a flight of 4.3km with over 160 images to be taken. Not only was it going to test my flight planning skills as I couldn't survey the lake with just one battery, it was going to need two, it was also going to test the post processing for the 3D map. I would need to plan for an overlap of images between the two missions so that the 3D map would be accurate, and I would need to be careful about the amount of time spent in the air because when flying over water there is no safe emergency landing zone. Clearly I hadn't anticipated all of the potential problems.

Last flight of the X350 Pro
The last flight of the X350 Pro ended with the drone ditching into the middle of this wetlands.
On the day the flying conditions were less than ideal, it was hot plus we had 25-35km/h winds blowing across the lake. I'd flown the X350 Pro in windier conditions before so I wasn't too concerned, however this lack of understanding of the affect of such wind on a battery would be one of the main contributors to the crash.

In my flight planning I had a 12min flight time, which usually gives me a 3min safety margin. In hindsight, I should have taken more notice of the wind and adjusted the flight time (in the field) to be a few minutes lower, to take into account the extra power that might be used by the drone to compensate for the strong winds and stay on the flight plan it was programmed with.

Last flight of the X350 Pro
Flight plan showing the first stage of the mission 

Last flight of the X350 Pro
Flight plan showing the second stage of the mission.
Another contributing factor to the crash, I suspect, was that my batteries were getting old and probably didn't hold as much capacity as they used to. This of course would reduce the flight time that drone was capable of flying. Without any kind of telemetry system built into the drone there was no way of knowing that the battery would not last the planned flight time.

I feel either a better instinctive analysis of the flying conditions that day or a more rigorous pre-flight checklist could have prevented this incident. Plus listening to my intuition and cutting the flight short when I felt something was not right would have also helped, all I needed was another 30sec of battery and I would have had the drone over the relative safety of dry land.    

Lessons learnt:

  • Take more notice of local conditions on the day of the flight and be prepared to modify flight plan to suit.
  • Add new points to my pre-flight checklist to ensure this analysis is done for every flight, regardless of conditions.
  • Test battery capacity more often and adjust standard flight time when necessary.
  • Where possible, only fly drones that have a bi-directional telemetry link to a ground station to enable real time monitoring of the systems. This will assist the drone pilot in making better decisions during the mission.
So I've had a setback but I'm not down. I'll re-group, learn from this mistake, purchase a new drone that has greater capabilities and safety features and will then continue with my journey. Stay tuned, I'll be back in a few months with more UAV 3D mapping missions.

This has been another 'drone adventure' in aerial surveying, inspection and mapping by The Aero Scout.